I purchased the new jacketed Unitank 2.0 during the black Friday sale in 2024 and couldn’t wait to get it. Like most home brewers, I’ve gone through several fermenters over the years. Starting with the classic carboys, then moving onto a Speidel tank. When it became time to replace the Speidel tank I didn’t hesitate on replacing my entire fermentation set up with a glycol chiller, and at the time a 14 and 17 gallon BME (Brew Master Edition) conical fermenters from Ss Brewtech. They were both great but over the course of a couple years I found myself making fewer and fewer 10 gallon batches and more 15 gallon batches. Putting me back on the market for an upgrade, and that’s when I decided the 17 gallon Jacketed Unitank 2.0 was going to be my next fermentor. As I’ve gone through upgrading my equipment over the years I’ve found myself swapping everything out to Ss Brewtech, and so far couldn’t be happier with the quality of their products.
Before I made the purchase, I did a lot of research on the 2.0 and was pretty skeptical about what Ss Brewtech was claiming it could do, since most companies over sell or over hype their products. From more stable temps during fermentation, faster cooling times, better cold crashing abilities, and easier/faster cleaning I figured if it could do half of that it would be money well spent. I was also excited to get rid of the cooling coil and not have to clean that part anymore.
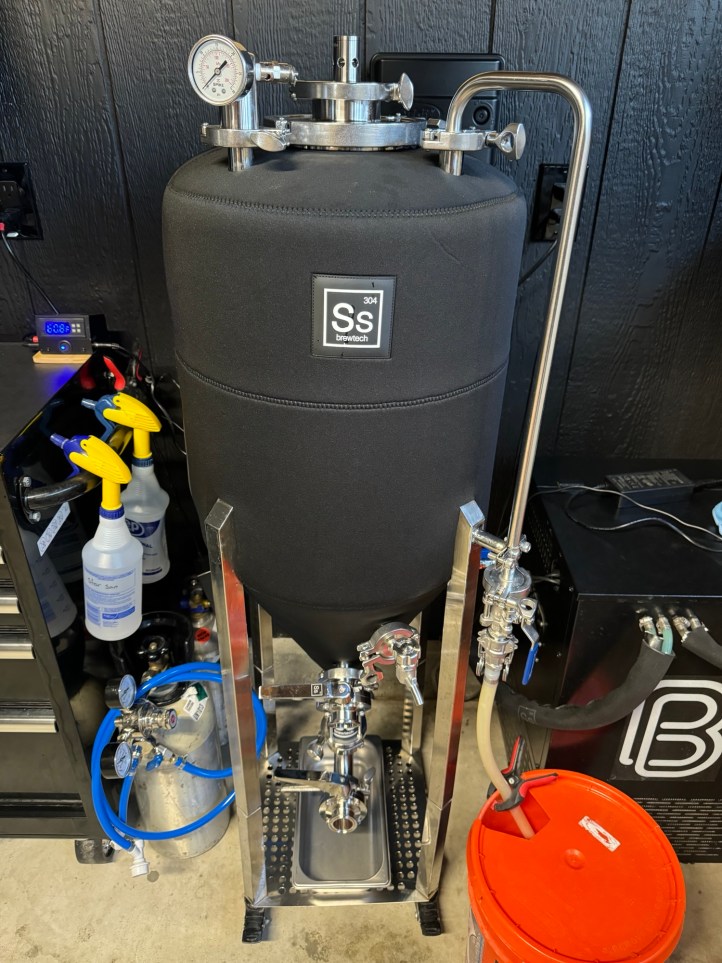
When I got the 2.0 I was beyond excited, aside from, temp control, a blow off hose or spunding valve it comes with everything you need to get it up and running. Fully assembled she weights 65lbs so I added wheels and leg extensions along with a couple other upgrades that we will get to later. The new 2.0 is very nice, the thermowell has been moved to the back and carb stone has been moved to the side behind the blow off arm. Leaving a nice sleek and clean looking fermentor with two butterfly dump ports and 1.5” TC pro sanitary sampling valve along with the new Ss Brewtech patch on the front of the fermenter. No more temp controller and bundle of wires on the front that can all be moved off to the side now. Or if you have kids like I do, you can now move the controller up and out of reach, and have no visible wires for them to pull on.
The cooling jacket in the fermentor is 11” tall, and starts at 4.5 gallons, at 9 gallons your a little less than half way up the cooling jacket. Giving you the option to make a smaller 11 gallon batch or a full 16.5 gallons. However the 2.0 does not have gallon markings on the inside, like the chronical 2.0 does. So you’ll have to pay attention to your boil kettle markings to know how much you are actually transferring. Honestly it’s not that big of a deal, with the domed top that leads to a 6” opening the markings would be pretty tough to see anyway. And yes, the cooling jacket does provide incredibly stable temps for longer periods of time. I still have a 17 gallon chronical 2.0 and on hot days or cold days you can watch it fight between heating and cooling cycles to stay at temp. Whereas the jacketed 2.0 will hit temp and stay there for long periods of time. Giving you more stable fermentation temps and less frequent temp swings.
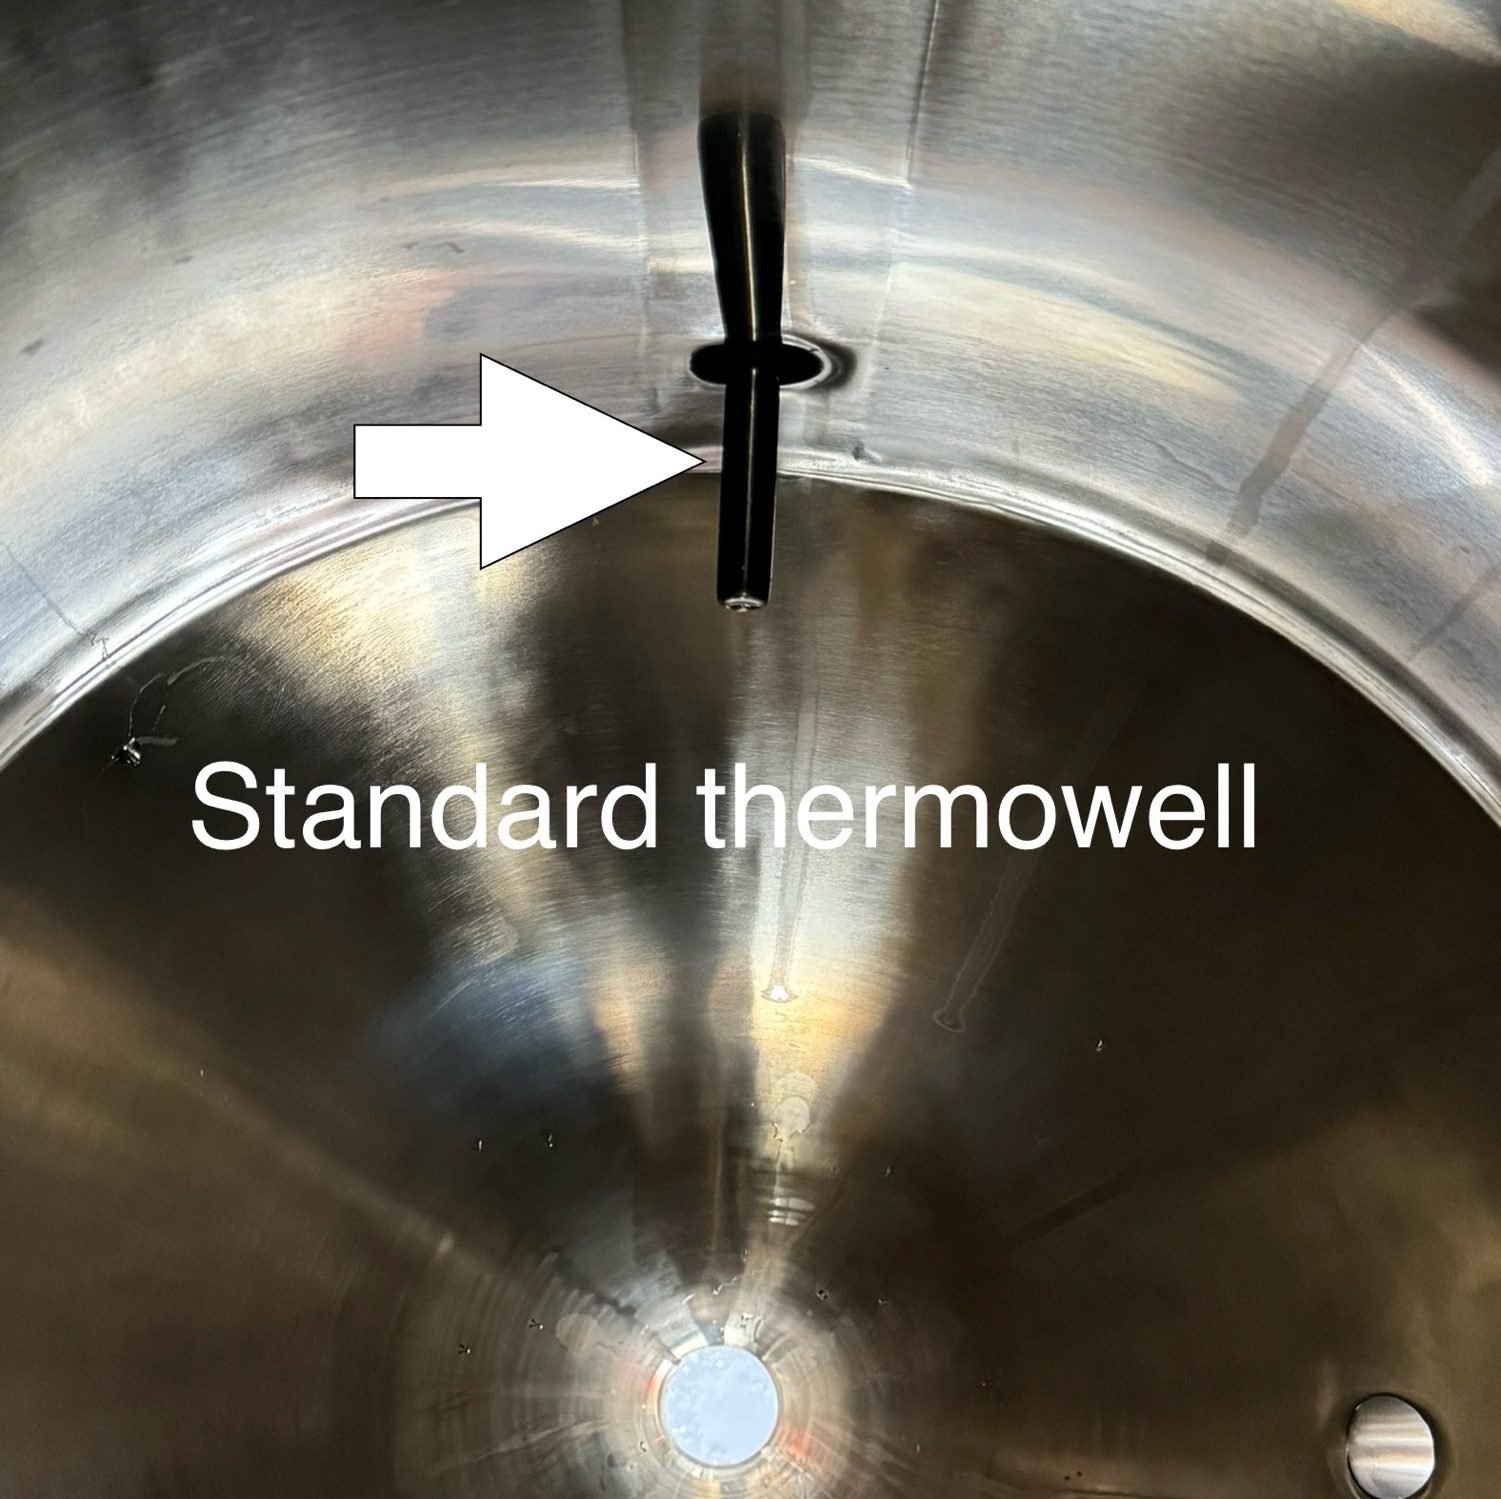
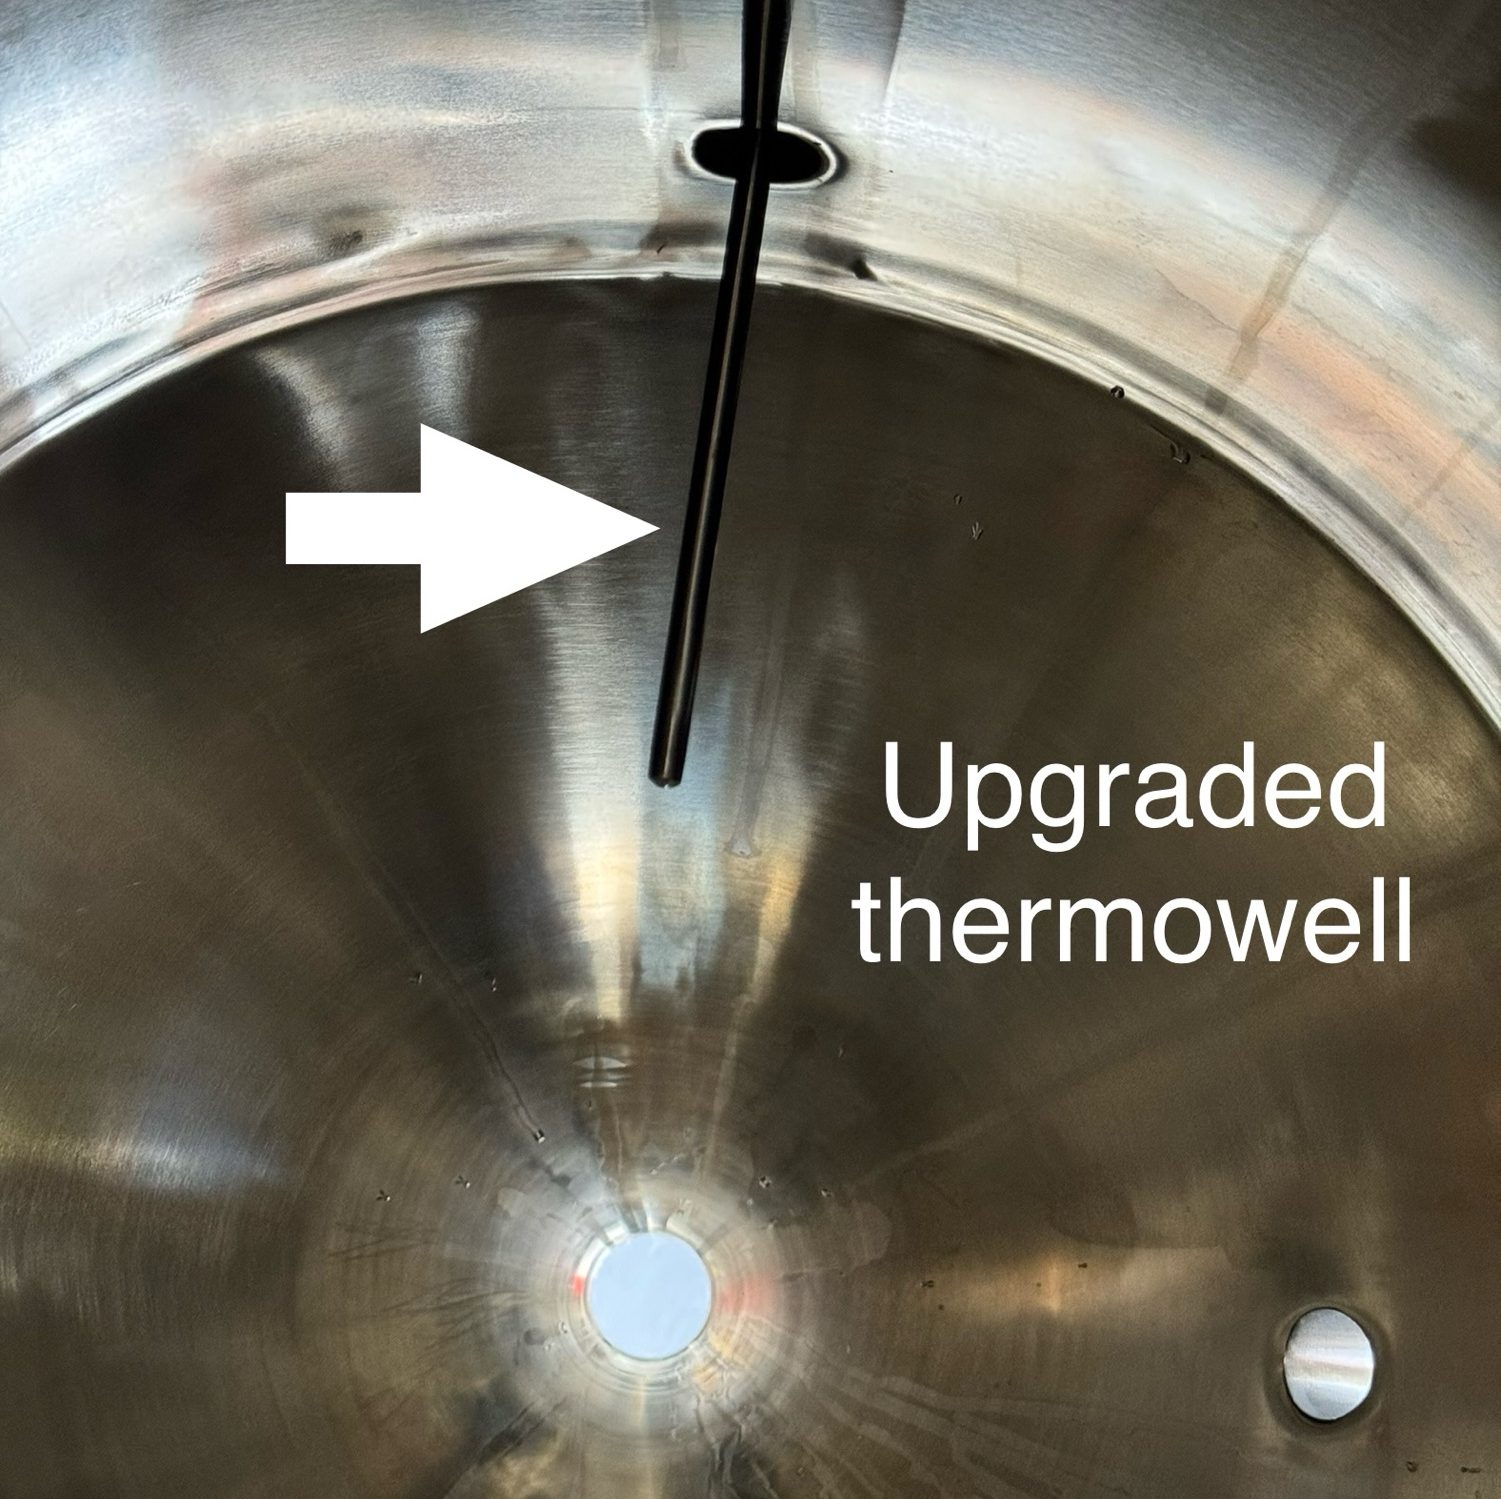
For the upgrade, there are not many and honestly only one of them is necessary. The other two were just to make my life easier. The important one first, the thermowell. The 2.0 comes standard with a 4” one but only 3” of it go into the fermenter. Which barely makes it past the cooling jacket. During my first brew day with it I noticed it did not give accurate temp readings because it’s too close to the cooling jacket. I was able to find this out with my handy dandy TILT hydrometer, the TILT was reading 85 degrees and the temp regulator on the fermentor said it was 70 degrees. So I took the top off, stuck another thermometer down into the fermentor to double check the TILT, and it also read 85 degrees. In order to get to 70 degrees on the first day I had to reduce the target temperature pretty significantly to hit 70 on the TILT hydrometer then pitch the yeast and let everything balance out. The solution is to buy a 6” thermowell it gets pretty close to the center of the 2.0 and I haven’t had any issues with temperature readings since making the switch.
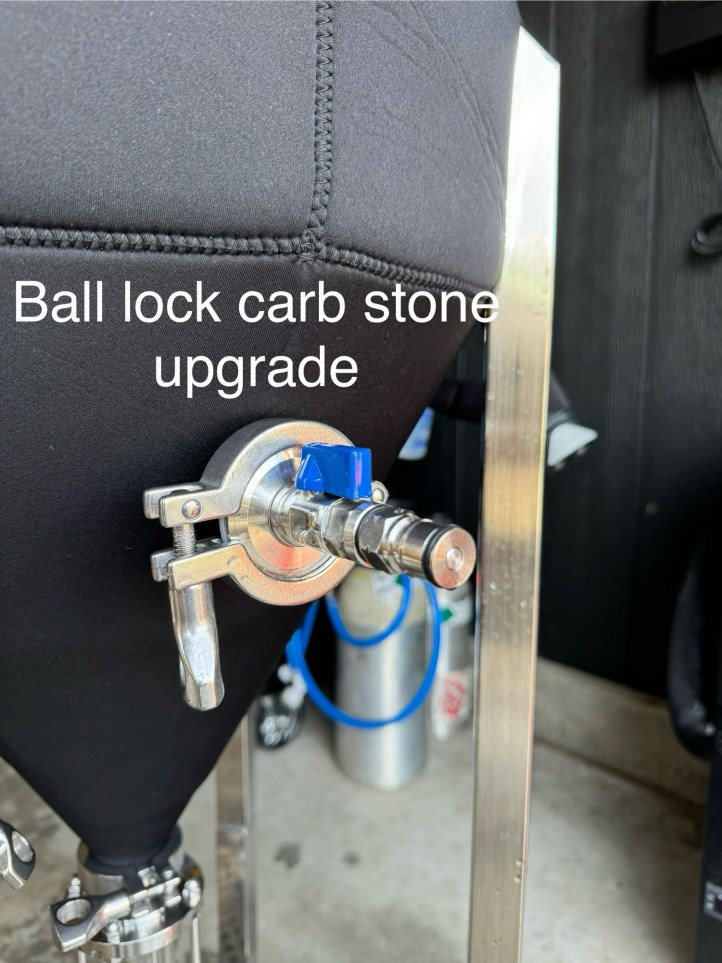
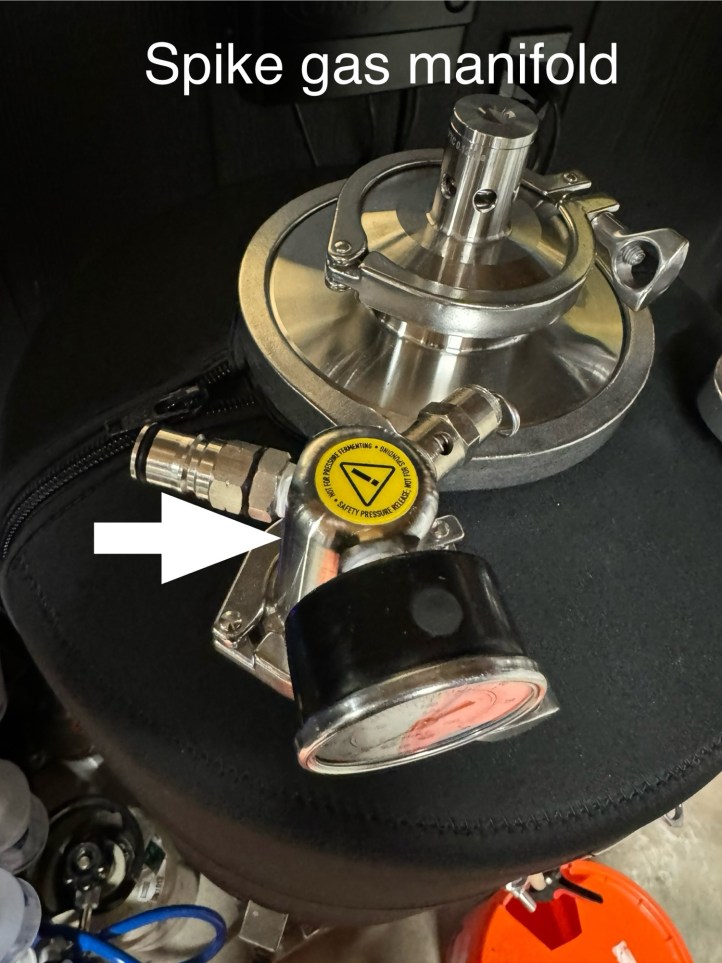
The upgrades that make life easier, a ball lock connection to the carb stone and the spike gas manifold. Personally, I was a bit surprised that the ball lock upgrade doesn’t come with the 2.0 or was even an option to upgrade to when purchasing the 2.0. It makes adding oxygen and carbonating your beer much easier and quicker when hooking up and taking apart. Since it’s all ball lock connections you don’t have to worry about something being inside the hose bard or inside your gas line. Ss Brewtech does sell the carb stone adapter fitting under accessories on their website, and the ball lock post bulkhead is from Morebeer. The spike gas manifold… hopefully Brewtech will come out with their own one day. For me at the homebrew level, it’s nice being able to add a co2 line directly to the top of the fermentor for purging, pressurized transfers, or adding pressure. I’ve done a few pressure transfers hooking up to the blow-off arm on the fermenter and while it does work, I’ve never really been a fan of doing it that way. You could possibly hook up to the carb stone on the 2.0 to pressure transfer, but why risk agitating your beer after you spent the time to cold crash. Also both of these upgrades would be well suited for the new Brite tank 2.0 as the carb stone port is on the bottom, and the manifold on top would make transferring out of the brite tank a breeze.
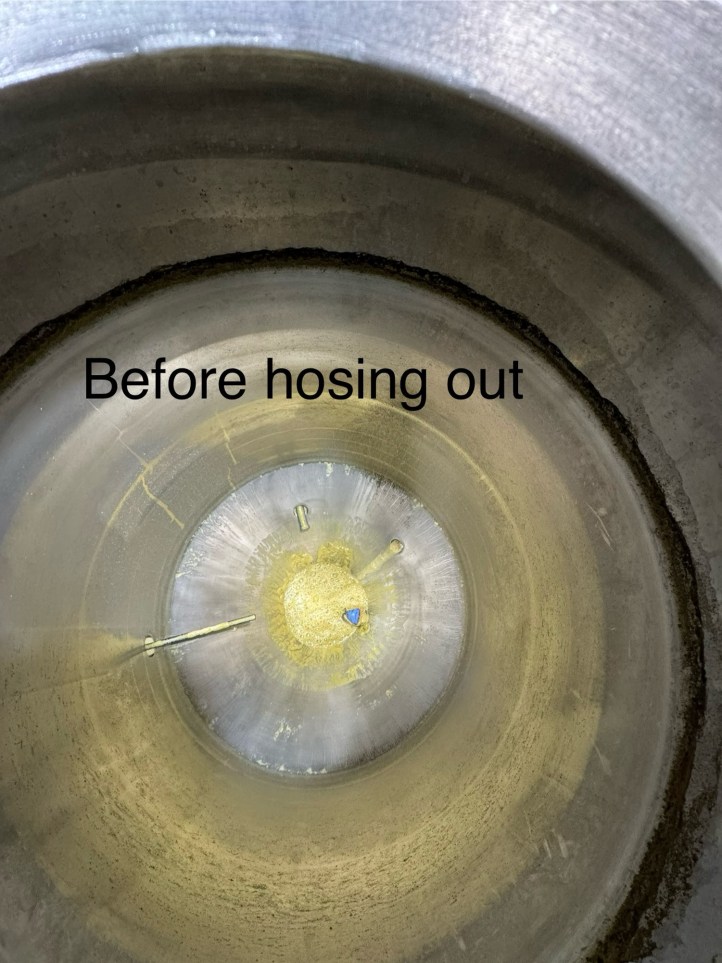
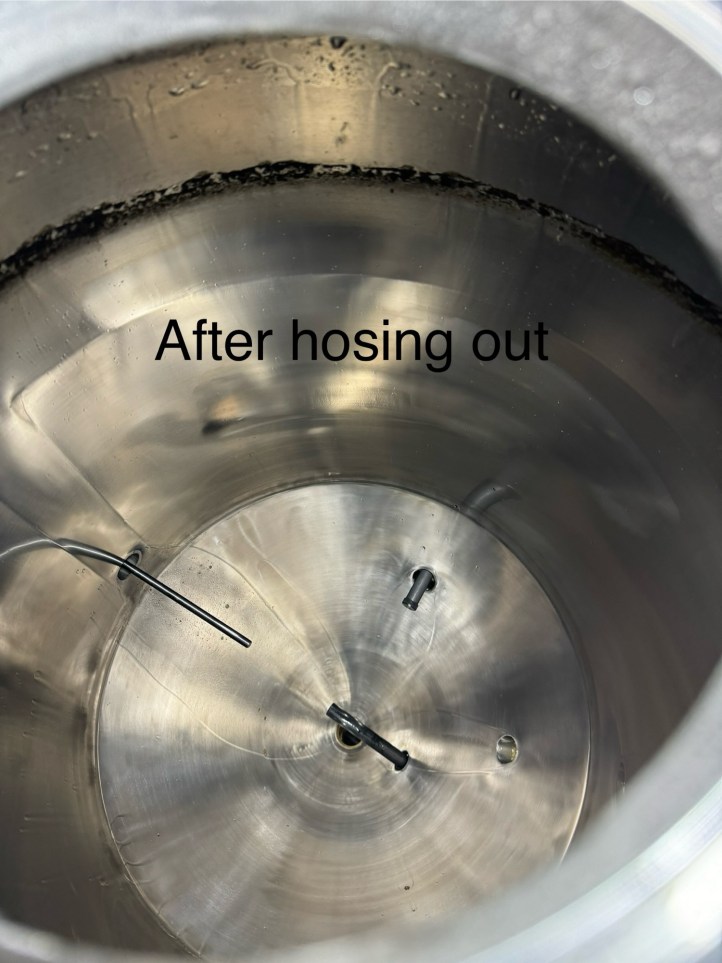
As for lower cold crashing temps, and faster cold crashing capabilities the 2.0 covers those bases too. The Uni 2.0 has no problem getting down to 36.5 degrees whereas my chronical 2.0 has a hard time hitting and staying at 38 degrees. And so far the beers I’ve made in the Uni 2.0 have seemed to clear up faster during cold crashing. Probably because of the colder temp and the fact that there isn’t a coil in there for yeast and dry hop debris to get stuck on and trickle off of. Another benefit to the jacketed unitank is no longer having to clean that cooling coil, the part I’ve dreaded most over the years. It never seems to matter how much I let it soak or run it through CIP there’s still always something stuck to it that needs to be scrubbed off. The polished inside of the jacketed uni does cut cleaning time in half, just hosing it out knocks off around 70%-80% of the gunk inside. Then hook it up to some hot PBW CIP and it’s nice and clean and ready for more beer in no time.
Having made several batches now in the new Uni 2.0 I have yet to find something that it hasn’t lived up to yet. From standard ale fermentation, lager fermentation and ramp up for diacetyl rest, faster cooling times, more stable fermentation temps, faster cleaning, and colder/faster cold crashing. It really has done it all with no problem. I’ve even used it as a brite tank and transferred an American Pilsner into the Uni 2.0 from my other chronical to let it carbonate and lager. Being able to serve beer from it is another added bonus. Overall, I couldn’t be happier with the purchase and would love to get another one day. If you’re in the market for another fermentor or looking to upgrade your current fermentor the new Uni 2.0 from Ss Brewtech brewtech needs to be at the top of your list!
By Justin T. Grounder’s Brewing Co.
Follow on Instagram
Discover more from MASHOUT MAGAZINE
Subscribe to get the latest posts sent to your email.
